# Generate FPGA Bitstreams
FlyDog SDR uses an FPGA to process the data sampled by the ADC, so the associated FPGA bitstream file (.bit) needs to be built.
# Build the Development Environment
FlyDog SDR uses Vivado 2022.2 for FPGA development.
# System Requirements
Vivado 2022.2 supports the following versions of operating systems and distributions.
- Microsoft Windows Professional/Enterprise 10.0 1903 Update; 10.0 1909 Update; 10.0 2004 Update: 10.0 20H2 Update; 10.0 21H1 Update
- Microsoft Windows 11
- Red Hat Enterprise Workstation/Server 7.4, 7.5, 7.6, 7.7, 7.9, 8.2, 8.3, 8.4, 8.5, and 8.6 (64-bit), English/Japanese
- CentOS 7.4, 7.5, 7.6, 7.7, and 7.9 (64-bit), English/Japanese
- SUSE Linux Enterprise 12 SP and 15 SP2 (64-bit), English/Japanese
- Amazon Linux 2 AL2 LTS (64-bit)
- Ubuntu Linux 18.04.1 LTS; 18.04.2 LTS, 18.04.3 LTS; 18.04.4 LTS; 18.04.5 LTS; 18.04.6 LTS; and 20.04 LTS, 20.04.1 LTS, 20.04.2 LTS, 20.04.3 LTS, 20.04.4 LTS; 22.04 LTS (64-bit), English/Japanese
Vivado 2022.2 will take up approximately 34 GB of disk space after installation.
For Vivado 2022.2 release notes, see Vivado Design Suite User Guide: Release Notes, Installation, and Licensing (UG973) (opens new window).
# Get Vivado
To download Vivado 2022.2, developers will need to create a AMD account (opens new window).
After logging in to your account, go to the Vivado 2022.2 download page (opens new window), select Vivado ML Edition - 2022.2 Full Product Installation and fill in the relevant form to obtain the file download link.
The file size of Vivado 2022.2 is 89.4 GB and you will need to have a good internet connection to download it.
# Installing Vivado
After unzipping Xilinx_Unified_2022.2_1014_8888.tar.gz, execute xsetup.exe as administrator on Windows and xsetup in privileged mode on Linux.
During the installation process, choose to install ISE WebPACK Design Software.
Once the installation is complete, the user can set the relevant environment variables to ensure that Vivado-related commands can be executed in the terminal (optional setting).
For Windows systems, add Vivado-installation-path/bin to the PATH in the Advanced System Settings.
For Linux systems, add export PATH=/opt/Xilinx/Vivado/2022.2/bin:$PATH to the current user's .bashrc file.
# Create a Vivado Project
# Source and IP Cores
Use Git to get the FlyDog_SDR_GPS core source code.
[fdsdr@flydog-sdr-project ~]$ git clone https://github.com/flydog-sdr/FlyDog_SDR_GPS.git
For mainland China developers, it's recommend to pull using the GitHub mirror github.com.cnpmjs.org .
[fdsdr@flydog-sdr-project ~]$ git clone https://github.com.cnpmjs.org/flydog-sdr/FlyDog_SDR_GPS.git
Create a new empty directory called project and create a new subdirectory flydog in this empty directory.
Then create two new directories import_src and import_ip in the flydog directory, with the following directory tree structure.
[fdsdr@flydog-sdr-project ~]$ tree -d project
project
└── flydog
    ├── import_ip
    └── import_src

3 directories
Copy everything under FlyDog_SDR_GPS/verilog to project/flydog/import_src and everything under FlyDog_SDR_GPS/verilog.Vivado.2022.2.ip to project/flydog/import_ip.
import_src contains the FPGA related project files and flydog/import_ip contains the related IP cores.
# Create a Project and Import the Source and IP Cores
Start Vivado 2022.2 and select Create Project under Quick Start on the home page to create a new project.
- In the wizard that appears, fill in the project name (flydog) and select the path to the
projectdirectory.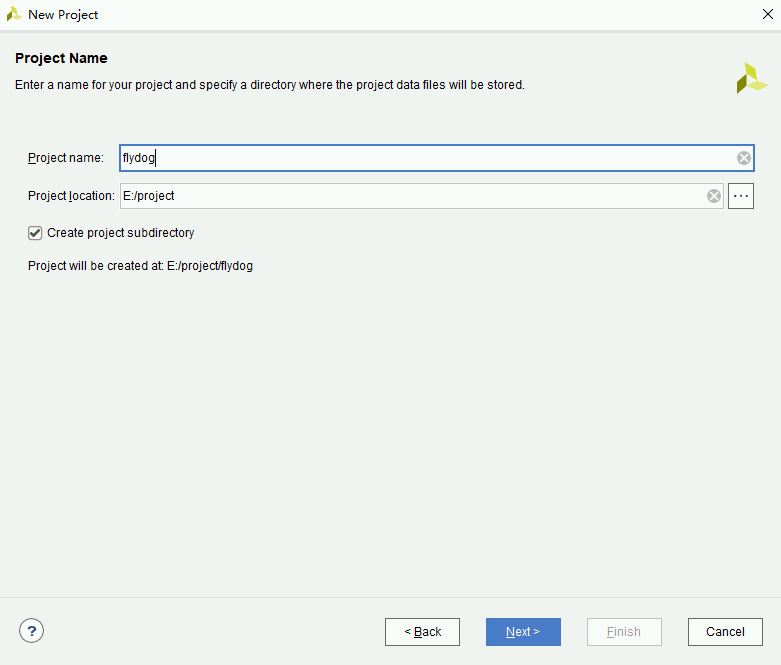
- Select RTL Project for Project Type and leave Do not specify source at this time unchecked.
- Click Add Directories and select
project/flydog/import_src. Check Scan and add RTL include files into project and Add sources from sub directories, uncheck Copy sources into project.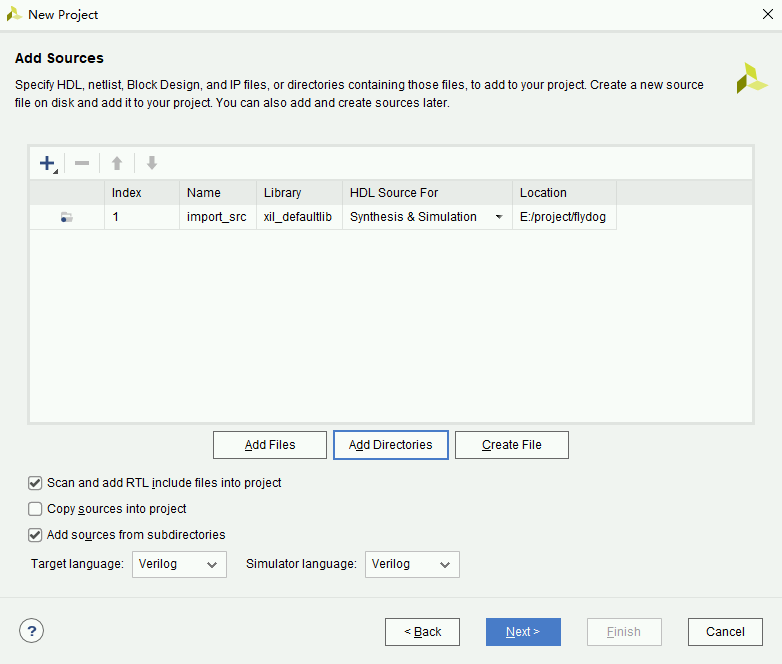
- Click Add Files on the Add Constraints page, select
KiwiSDR.xdcand leave Copy constraints files into project unchecked.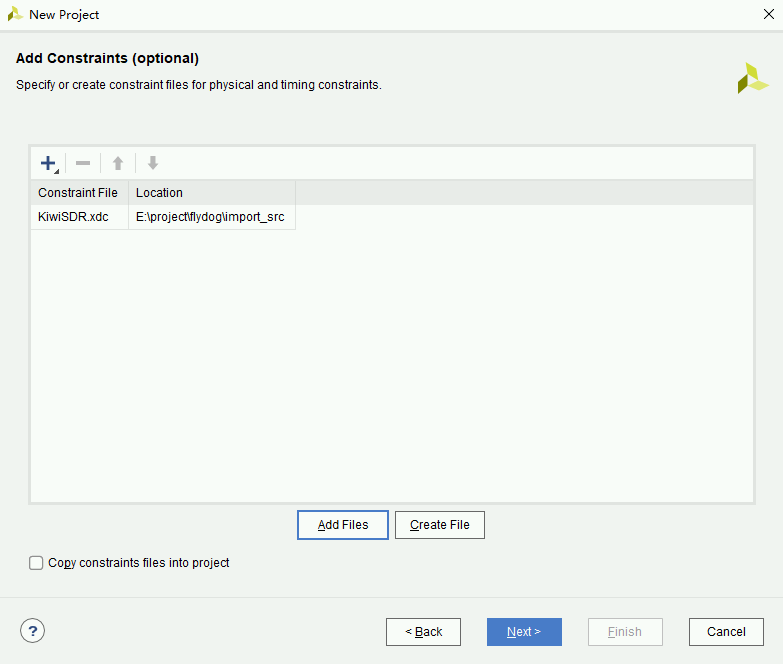
- Select the hardware in the Default Part page. Type
xc7a35tftg256-1in the search box and check the listed hardware.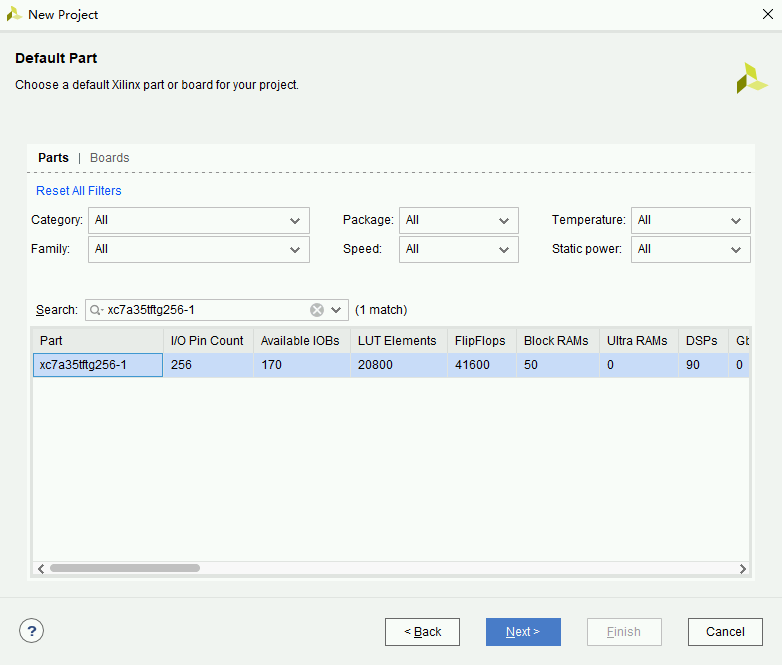
Once the project has been created, click Add Sources in the left menu of the Vivado 2022.2 main screen to add the IP cores.
- Select Add or create design sources in the wizard that appears.
- In the Add or Create Design Sources page that appears, click Add Directories and select
project/flydog/import_ip. Check Copy sources into project and Add sources from subdirectories, uncheck Scan and add RTL include files into project.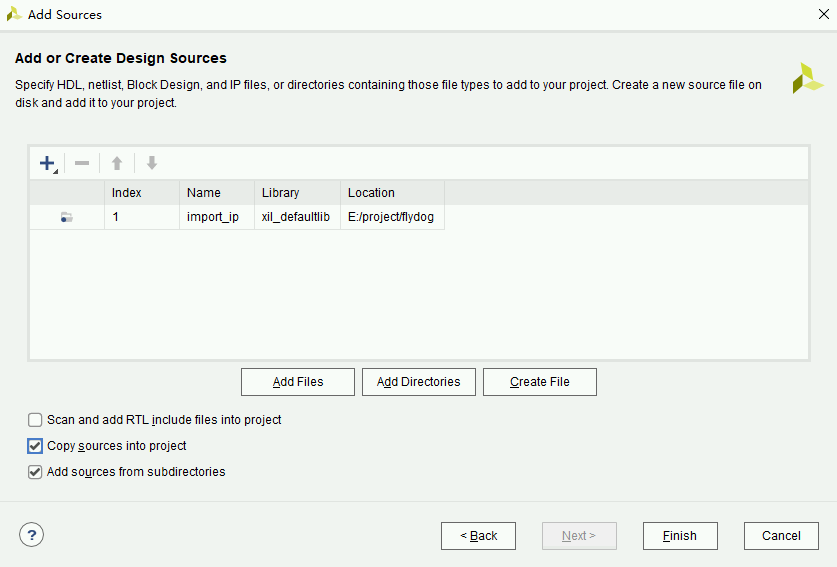
- Click Finish to complete the import of the IP cores.
The critical warning that appears during IP core import is safe and can be ignored.
# Upgrade IP Cores
To ensure that the build process goes smoothly, the IP cores need to be upgraded.
In the menu above the Vivado 2022.2 main interface, click Reports and select Report IP Status.
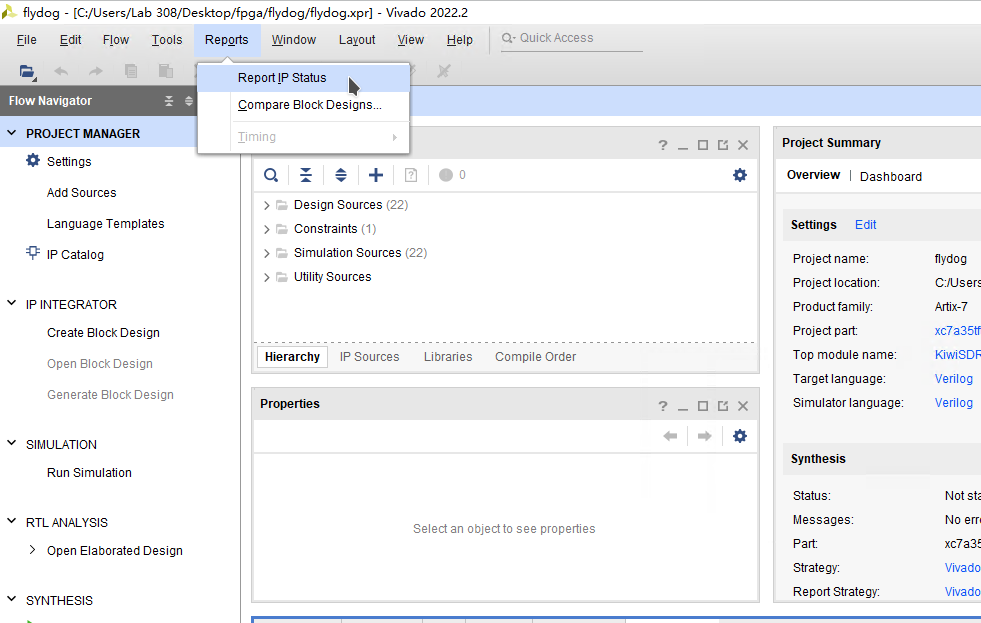
In the IP Status tab below the Vivado 2022.2 main interface, click Upgrade Selected, then click OK in the pop-up dialog box to upgrade the IP cores.

# Generate FPGA Bitstream
In the Sources window, expand the Verilog Header entry and double click on kiwi.cfg.vh to edit it.
kiwi.cfg.vh will specify that Vivado 2022.2 generates different FPGA bitstream files, corresponding to the 4 FPGA modes of the FlyDog SDR.
# KiwiSDR.rx4.wf4.bit
By default, the configuration in kiwi.cfg.vh is 4 users (rx4) 4 waterfalls (wf4).
Click Generate Bitstream in the left menu of the Vivado 2022.2 main interface, Vivado 2022.2 will then synthesize the IP cores and, once the synthesis is complete, start generating the FPGA bitstream.
The time used for this process varies depending on the configuration of the computer.
During synthesis, a Synthesis out-of-date warning will appear and can be ignored.
The path to the generated FPGA bitstream file is project/flydog/flydog.runs/impl_1/KiwiSDR.bit. Rename the file to KiwiSDR.rx4.wf4.bit and move it to another directory.
Close Vivado 2022.2 directly and reopen the project via project/flydog/flydog.xpr to avoid a Synthesis out-of-date error in Vivado 2022.2 that will cause the IP to be synthesized again when generating other mode FPGA bitstreams next time.
# kiwiSDR.rx3.wf3.bit
Change the RX_CFG string in the kiwi.cfg.vh file to 3.
The code is as follows.
parameter RX_CFG = 4;
``define USE_WF
Then click Generate Bitstream in the left menu of the Vivado 2022.2 main screen.
The path to the generated FPGA bitstream file is project/flydog/flydog.runs/impl_1/KiwiSDR.bit. Rename the file to KiwiSDR.rx3.wf3.bit and move it to another directory.
# KiwiSDR.rx8.wf2.bit
The operation is roughly the same as generating KiwiSDR.rx3.wf3.bit , but the kiwi.cfg.vh file has a corresponding value of 8 for the RX_CFG field.
The code is as follows.
parameter RX_CFG = 8;
``define USE_WF
The path to the generated FPGA bitstream file is project/flydog/flydog.runs/impl_1/KiwiSDR.bit. Rename the file to KiwiSDR.rx8.wf2.bit and move it to another directory.
# KiwiSDR.rx14.wf0.bit
The operation is much the same as generating KiwiSDR.rx3.wf3.bit , except that the RX_CFG field in the kiwi.cfg.vh file has a corresponding value of 14 and the define USE_WF field needs to be removed or commented out.
The code is as follows.
parameter RX_CFG = 14;
The path to the generated FPGA bitstream file is project/flydog/flydog.runs/impl_1/KiwiSDR.bit. Rename the file to KiwiSDR.rx14.wf0.bit and then move it to another directory.
