# Open FlyDog SDR to Public Network
# Available External Access Methods
There are three ways in which you can open the FlyDog SDR to the public network.
- Using a fixed IP
- Using DDNS
- Using reverse proxy
# Which Method to Choose
You should first understand your network environment and then make your choice.
Generally speaking, there are three types of network environment, which correspond to the three ways of opening the FlyDog SDR to the public network.
- With a fixed public IP address: the user simply forwards the relevant port on the router or switch in the same network segment where the FlyDog SDR is located, and then uses the IP to access it on the public network
- With dynamic public IP address: users need to use DDNS service, bind the dynamic IP to the domain name assigned by DDNS, and then use the domain name assigned by DDNS to achieve public network access
- No public IP address: because the ISP does not provide the user with a public IP address (e.g. NAT conversion service is used) or the operator denies incoming connections to the user's IP, you need to use the reverse proxy service provided by FlyDog SDR Project for public access
# Using a Fixed IP
- Fixed IP provided by ISP
1.1.1.1as an example - The operation on the gateway (router or switch) is based on OpenWRT, other gateway devices are similar
Login to the OpenWRT administration, go to Firewall - Port Forwards and configure port forwarding.
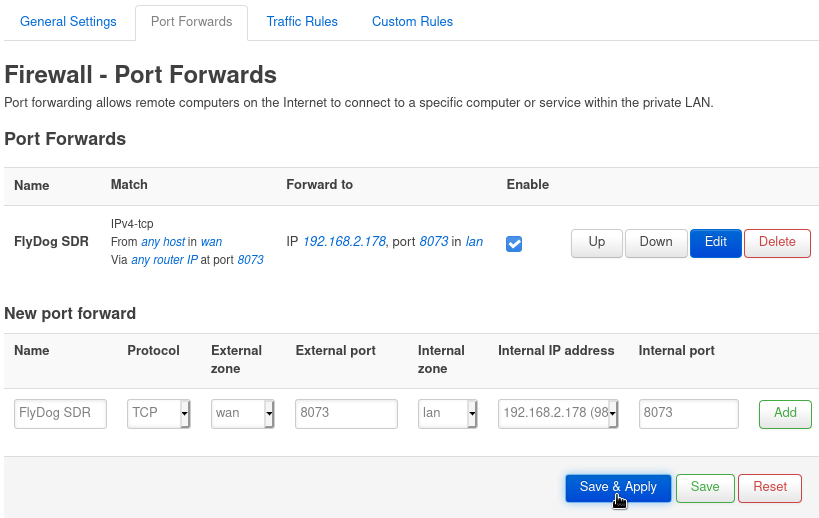
After setting the relevant port forwarding, save and apply the settings.
Login to the FlyDog SDR Admin, go to the Connect tab, select Public IP, fill in the form with the fixed IP address provided by the ISP and bind the IP address to the system.
Follow the instructions and restart the FlyDog SDR application.
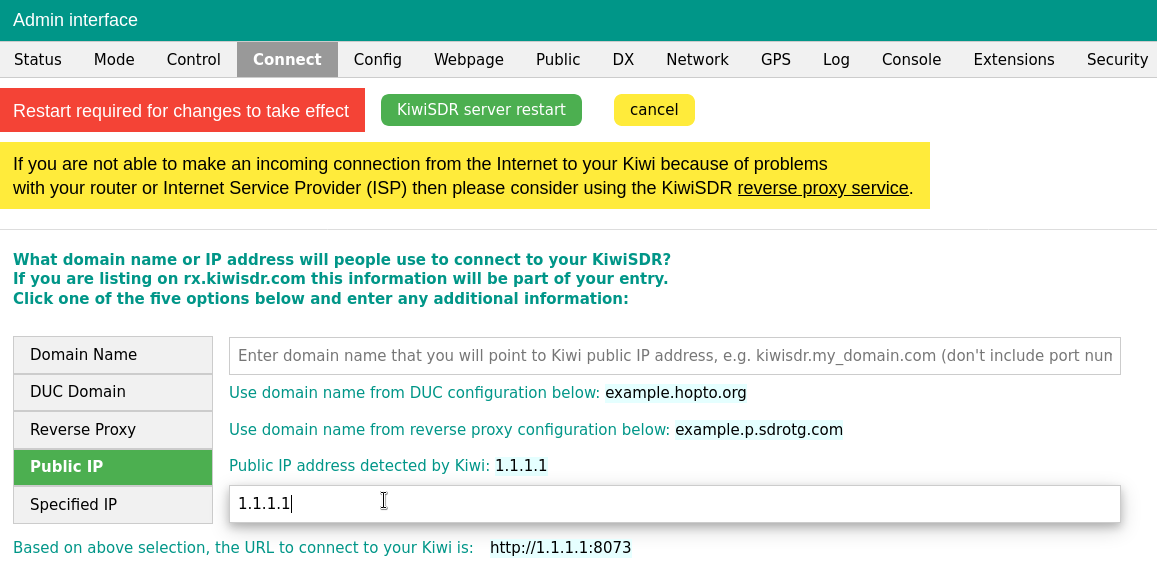
After the restart, it is no surprise that you can now access the FlyDog SDR externally using 1.1.1.1:8073.
# Using DDNS
FlyDog SDR comes with a free DDNS service provided by No-IP (opens new window).
- The email address for No-IP registration is
[email protected]. - Password for No-IP login is
password. - The hostname of the No-IP application is
example.hopto.org.
Go to No-IP (opens new window) to register an account and set a hostname.

Login to the FlyDog SDR administration, go to the Connect tab, fill in the Dynamic DNS update client (DUC) configuration form with the information registered and obtained from No-IP and set Enable DUC at startup.

After completing the form, click Click to (re)start DUC to register the DDNS service with the system.
Scroll to the upper part of the page and select DUC to enable the DDNS service.
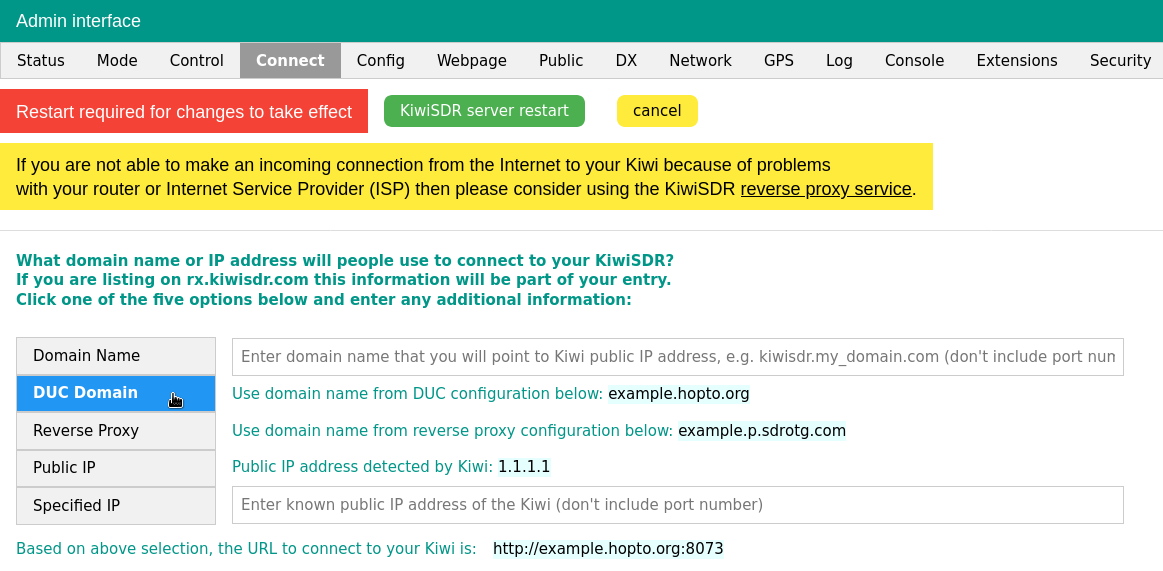
After enabling the DDNS service, restart the application according to the system prompt.
Once the restart is complete, you can use example.hopto.org:8073 for access.
**Due to No-IP's efforts to avoid domain name abuse, hostnames requested by free users need to be authenticated once every 30 days. Please refer to why-is-my-hostname-pending-deletion (opens new window) for authentication methods. Users can also use other DDNS service providers to avoid the hassle of authentication, but will need to run the relevant service separately (e.g. on the router). **
# Using Reverse Proxy
The FlyDog SDR Project offers free reverse proxy service for users and provides two URLs for access.
- For global acceleration:
example.p.sdrotg.com - Optimised for mainland China:
cn.example.p.sdrotg.com
# Get Connection Credentials
Users can send an email to [email protected] to get the connection credentials for using the reverse proxy.
The email should include the FlyDog SDR built-in Serial Number, which you can obtain from the Network tab on the administration page.
The email format is as follows.
To: [email protected]
Subject: Reverse proxy request
Body:
    Serial number: 4321
    Requested hostname: example
    Mainland China optimisation: yes
Once the request is received by FlyDog SDR Project, the reverse proxy connection credentials will be distributed to the user within 3 working days.
When the user needs to change the Hostname, they will need to send a new copy of the same email to change the record.
# Configuring the Reverse Proxy
- User key example:
fa51b0d8-f92c-4acb-bace-ddfc8d92107f - Hostname example:
example
Login to the FlyDog SDR administration, go to the Connect tab and fill in the Reverse proxy configuration form with the reverse proxy connection credentials assigned by the FlyDog SDR Project.

Once completed, click Click to (re)register and wait for the page to return Existing account, registration successful, which means the registration was successful.
Scroll to the top half of the page and select Reverse Proxy to enable the reverse proxy service.
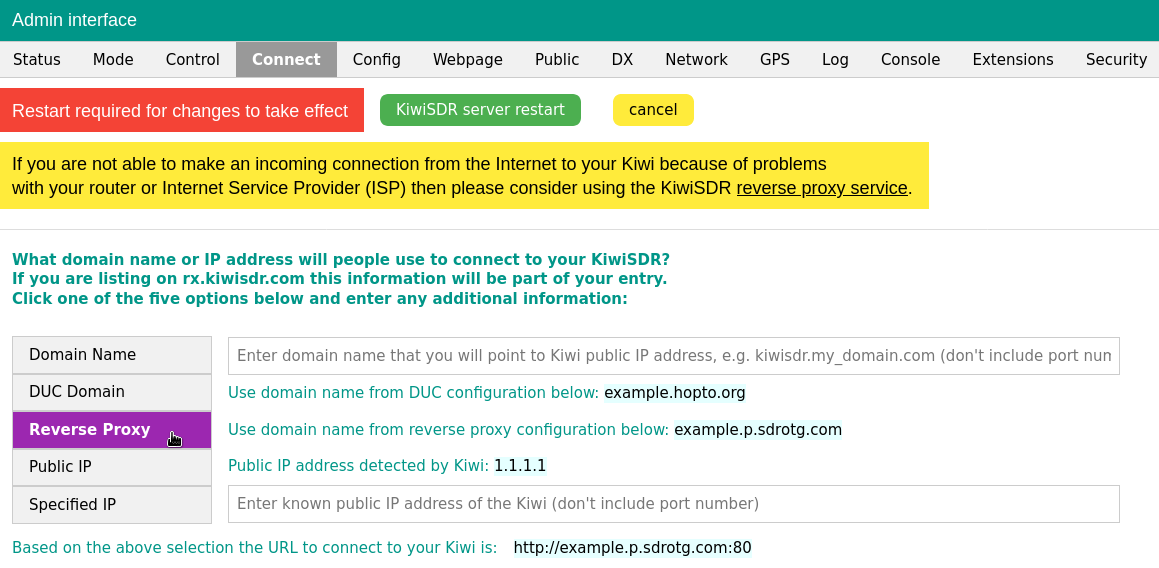
Once you have enabled the reverse proxy, restart the application when prompted.
Once the restart is complete, you can use example.p.sdrotg.com or cn.example.p.sdrotg.com for access.
# Change External Port
Since FlyDog SDR runs on a container, the default port 8073 cannot be changed.
However, when mapping FlyDog SDR to the public network, users can use the port forwarding feature on the router or switch to allow access from external networks using other ports.
In the case of OpenWRT, the port for external access to the FlyDog SDR can be changed in Firewall - Port Forwards.
For example, if you need to use port 8074 on the external network to access the FlyDog SDR, you need to enter 8074 for the External port and 8073 for the Internal port.
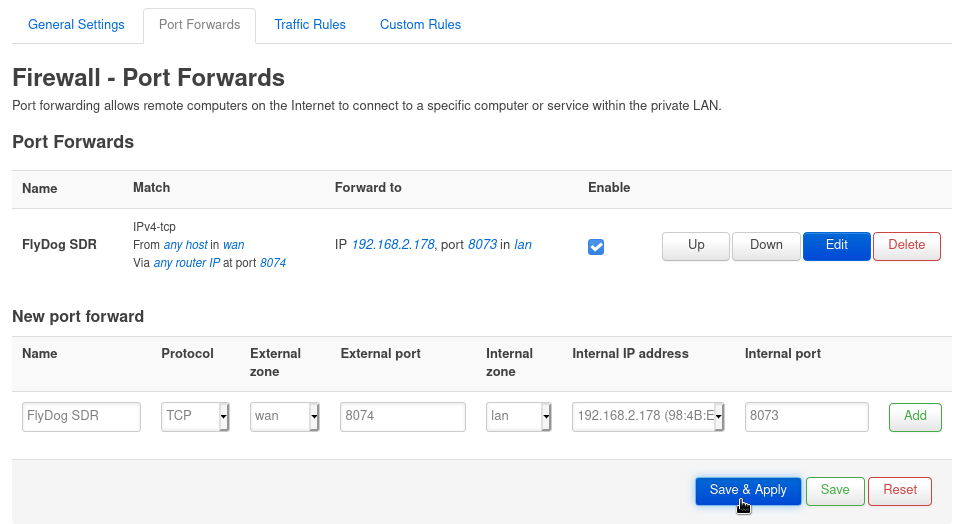
Once you have saved and applied the rule, then go to the FlyDog SDR administration, switch to the Network tab and change 8073 to 8074 in the External port form.
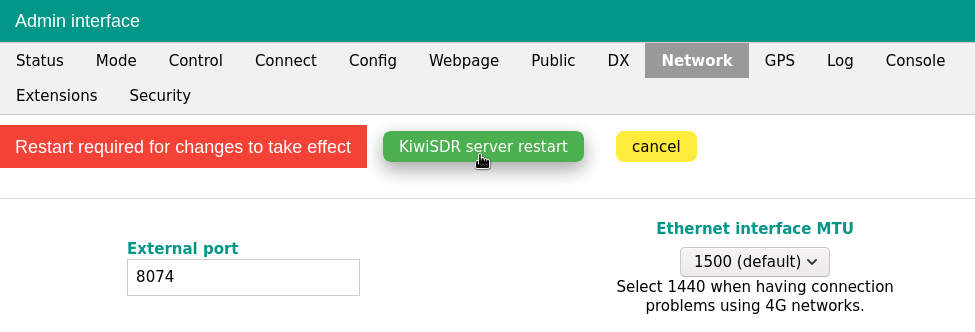
This is so that the site information uploaded by FlyDog SDR to rx.linkfanel.net will be also updated after the external port has been changed.
Users can then access FlyDog SDR on the external network on port 8074, while the internal network is still accessible on port 8073.
